Thursday, 30 August 2012

Annie's Special Rice


A big ole mix of chicken, vegetables and rice - this is a dinner that started when me and mum were trying to use up everything we had in the fridge and has evolved from there to become a staple meal that we loveee.


When cooking big meals for my family, I like to make things up as I go along, using classic flavour combinations that I know work, the key being to always taste as you go! The beauty of savoury cooking is that it's not nearly as precise as baking so you can really change it to suit just how you're feeling. This turns out slightly different every time but is always just as delicious! 

It's easy to prepare for groups, or just for one to have for leftovers throughout the week. I always pack this out with veg and I'm not really fussy with what goes in, usually just using whatever we have in the fridge.

The fried egg on top may seem a bit odd, but just trust that it works! Many Asian countries use a lot of eggs in their cooking and will often pop an egg on top of a dish. I must admit that when I was first served a curry in Cambodia and it came with a fried egg on top I was slightly confused, but it definitely adds something special to so many dishes. The yolk acts as almost a second sauce and the mildness can combat spicy flavours, complimenting the whole dish beautifully.

The rice we use really makes this dish for me, its a short grain from Niigata, Japan - a special gift from Tomoko, my sister-in-laws, family. The rice grows in the field out the back of their house and we were sent over a huuuge bag that we're slowly but surely working our way through. You can use whatever rice you like but always rinse it thoroughly before cooking, a top tip from my brother for perfect rice.

This time I used:
1 Pepper (red or yellow are my faves)
1 Red Onion
10 Baby Courgettes (or about 3 normal ones)
A Good Handful of Tenderstem Brocoli
200g Cup Mushrooms
Frozen Peas
3-4 Cooked Chicken Breasts
Rice (about 1/2 to 1 cup per person)
Quantities are very much guess work here but as long as every thing is roughly in even quantities it's fine. This will serve abount 4 people, with leftovers too! Annie's portions are always big.

3 tablespoons Dark Soy Sauce
1 tablespoon Teriyaki Glaze Sauce (I've used a good one from Waitrose Cooks Ingredients range)
1 clove garlic
Red Chillis (to taste)
Thumb size piece of Ginger
1/2 tablespoon Sesame Oil
A few drops of Tabasco

Light Soy Sauce, to taste throughout cooking
Pinch of Smoked Paprika 
Eggs (one per person)

To make:

  • Start by chopping up all the veg and chicken into similar sized chunks. 

  • Chop the chilli, crush the garlic and grate the ginger and put these in a bowl with the onion, dark soy sauce, teriyaki, sesame oil and tabasco and mix to let all the flavours come together and leave for at least half an hour.
This time I have used leftover cooked chicken but when using raw chicken add that to the mix aswell to let it marinate.
  • Cook the rice, I have a rice cooker that does all the hard work for me, but do as you please.

  • In a large wok, heat some sesame oil and pour in the prepared onion and sauce mixture. Fry until the onions are soft.
  • Add the mushrooms and fry for about 2 minutes longer.
  • Then add all the other veg, except the peas, and fry until all is cooked but still have a slight crunch…no soggy veg here.
  • Add the chicken and stir in the peas.

  • Add the paprika, it adds a delicious smokiness to the dish and a different kind of heat to the chillis.
  • Stir in all of the rice and taste, adding more soy sauce if desired.
  • Turn off the heat but leave in the wok as you fry the eggs.
  • Serve in a big bowl with the fried egg on top and another splash of soy for good measure.

Mmmmm enjoy :-)

Friday, 24 August 2012

Gluten Free Chocolate Brownies

The perfect brownie recipe - fudgey, chocolately and gooey, with the crisp shiny top, chewy edges and even more melty chocolate chunks hidden inside. 
Plus they're gluten free! What more could you ask for?


You will need:
370g caster sugar
80g cocoa powder
60g gluten free flour
1 tsp baking powder
4 eggs lightly beaten
250g melted butter
2 tsp vanilla extract
200g plain/dark chocolate finely chopped

To make:

  • Preheat oven to 180°
  • Grease and line a 9inch square tin.
  • Mix together sugar, cocoa, flour and baking powder in large bowl.
  • Add the eggs, butter and vanilla and mix until combined.
  • Stir in choc chunks.


  • Pour into tin and level.
  • Cook for 40-45 minutes.

  • Try to resist eating them right away and leave them in the tin to cool down.
  • Lift out of the tin using the greaseproof paper and cut into squares.


Enjoy with a cold glass of milk...


Wednesday, 22 August 2012

Home Made Falafel


This recipe makes making your own falafel so easy and quick by using chick peas from a can, rather than having to faff around soaking them overnight.

These can be served hot straight from the pan, or cooled down as a light snack later on! I recommend serving them in pitta or wrap bread with lots of salad, humus and harissa paste for the best lunch.


The Ingredients:
(25 falafel balls)
2 cups tinned chick peas
Crumbs from 2 slices of white bread
5 cloves of garlic
2 teaspoon baking soda
1/3 cup chopped parsley
1/2 cup chopped coriander
1/2 small onion
1 spoon of sesame seeds
1 teaspoon cumin spice
1 teaspoon paprika

1 small chilli
Salt, pepper
Oil for  frying


To Make:
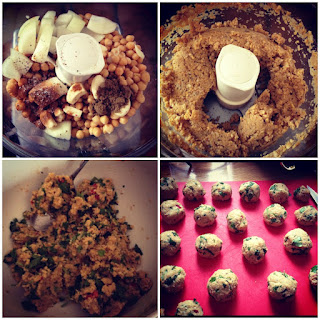
  • Put the chickpeas, garlic, onion and spices in a food processor.
  • Grind until you get a rough moist texture. Add a little water if needed.
  • Move the mixture into a large bowl, add the rest of the ingredients and put aside, covered, for 30-60 minutes.

  • Add the baking soda to the mixture and knead a little.
  • Wet your hands and shape little balls (smaller then apricots).  
  • Fry in a little oil until you get a deep brown shade.

Now to have some fun making the wraps:
We simply cut up the falafel and covered with some holloumi cheese, to make it extra nice we melted the cheese and then overed with piles of salad, humus and tomato chutneys. Yum.


Wednesday, 15 August 2012

Peanut Butter Mars Bar Cookies


Another peanut butter recipe here, but in my opinion there can never be too many.
These cookies are melt in your mouth amazing, with a gooey mars bar treat hidden inside, for me they're near perfect.

The plain peanut butter cookie dough also works really well just baked on its own or you can swap the mars bar centre out for any chocolate bar you fancy, or just add a handful of chocolate chip into the mix! Swap and change however ya like to make your perfect cookie.

They couldn't be more quick or easy to make and only take about 10 minutes to bake so you'll be enjoying them in no time!


You will need:
125g salted butter, softened to room temperature
100g dark brown sugar
50g granulated sugar
1 egg
125g creamy peanut butter
1 tsp vanilla extract
1/2 tsp baking soda
175g plain flour
Mars bars (approx 3, chopped) or mini mars bars will do
Makes 12-24, depending on size

  • Preheat oven to 180°C and grease two cookie sheets.
  • In a large bowl using a hand-held mixer or using a stand alone mixer, cream the butter and sugars together. 
  • Mix in the peanut butter, egg, and vanilla. 
  • Gradually mix in the baking soda and flour using a wooden spoon. 

  • Chill the dough for 30 minutes in the fridge as it helps it to become more manageable.
  • Take a spoonful of the chilled dough. Press this down onto the cookie sheet and pop a piece of Mars bar in the middle, cover with another spoonful of the dough and seal down the sides. Repeat with the rest of the dough. Make sure to leave a good space between the dough balls on the sheet as they do spread quite a bit!


  • Bake for 9-12 minutes, or until they're golden brown.
  • Remove from oven and allow to cool on a wire rack. 


As you can see the cookies I've made are quite large, I used about a tablespoon for the base of each and quite a good chunk of Mars bar for the centre. You can use smaller pieces of Mars in the centre if you want a smaller cookie, or obviously if you want them bigger, go bigger!

Now it's again the time to enjoy the fruits of your labour… that is, if you're not too full from munching on Mars pieces as I usually am.

Friday, 10 August 2012

Shake Shake Shake


I am, pretty much, peanut butters biggest fan. Ever.

I can enjoy peanut butter in so many ways:
- I eat it straight out of the jar
- on toast
- in Rose's amazing PBJ Bars
- in cookies, cupcakes, or whatever else I can think of
and in a whole world of other delights.

But today, is the day, for peanut butter milkshakes.

Now, I've tried my fair share of peanut butter shakes in my time. Hunting them down in diners (Ed's or The Diner do a very good job here) and always opting for Reece's cups to be put in my shake over a whole host of other treats at milkshakes shops far and wide.

So now, after much extensive market research, I've been thinking its about time I try my hand at my own Peanut Budda Shake. 
In this one I've chosen to add my old friend Nutella into the mix, as there's not much better than the combination of PB and choc.


This is hardly a recipe, but if you want to join in on the action, you will need:
6 scoops vanilla ice-cream
1 cup of milk
4 tablespoons peanut butter (Skippy's my fave but any will do the job)
3 tablespoons Nutella
Make 2 shakes

Feel free to adjust quantities, the more ice-cream you add, the thicker the shake will be and if its too thick, just add more milk! If you want it more choc than PB than of course you can add more or less as you please.

All you have to do is pop everything in a blender and whizz away until its all bubbly and milkshake like, then serve in a tall glass, preferably with a straw.
We didn't have any straws handy when the craving for a shake set in, so a Twix finger just had to do.


Enjoy!


Tuesday, 7 August 2012

An Oldie, But A Very Goodie

Granny's Millionaire Shortbread


Here is one of my very favourite things to make (and eat) with a layer of crumbly shortbread and smooth caramel, topped off with a thick layer of chocolate, they are the perfect treat for any occasion.

This particular recipe will always remind me of half-terms spent staying with my grandparents. I always snuck back for seconds as I was a very greedy little thing and, of course, they were just so more-ish.

It's a relatively simple recipe to follow, you just need to remember to leave time for the chocolate to set.


To make, you will need:
For the base:
4 oz butter
4oz caster sugar
6oz self raising flour

For the caramel:
4oz butter
4 oz caster sugar
1 small tin condensed milk
3 tablespoons golden syrup

And finally:
8oz milk or dark chocolate
White chocolate to decorate (optional)

Process:
  • Pre-heat oven to 175°C.
  • Grease and line a swiss roll tin with greaseproof paper.
  • Now, set about making the shortbread by creaming the butter and sugar in a large mixing bowl with a wooden spoon.
  • Sift in the flour, kneading with your hands if necessary to form a crumbly mixture.
  • Press into a swiss roll tin with a metal spoon to create an even level.
  • Bake for 10-15 minutes


  • So, now we can move onto the caramel by melting the butter and sugar in a saucepan over a medium heat.
  • Then, add the condensed milk and golden syrup and mix.


  • Boil gently for 5 minutes, stirring throughout to prevent the caramel from sticking. You will feel the mixture start to turn, thickening in texture and going a more golden, darker caramel colour.


  • Once this is done the caramel is ready to be poured over the baked shortbread whilst still warm, carefully encouraging it into the corners of the tin to again create an even layer.
  • Using a bain-merie melt the chocolate.
  • Pour the melted chocolate over the cooled shortbread and caramel.


  • Pop in the fridge for a few hours to help the chocolate chill completely.
  • As an extra, I've melted some white chocolate to decorate, drizzling with a spoon and using a fork to create a pattern.
  • Chill until completely set and then, lift out of the tin using the greaseproof paper.
  • Using a sharp knife, cut into squares.


Et Voila!


Now comes the time for eating...


Sunday, 5 August 2012

Team GB Red Velvet Cupcakes


Red Velvet cake holds a certain nostalgia for me. I first tried it years ago whilst spending Christmas across the pond in America with my family. I remember so clearly the shock us Brits felt when we cut through the glorious cream cheese frosting to find a cake that was…red??
Of course having the sweet tooth that I do, I was first in line to try this mysterious cake and was not, for one second, disappointed. 

Nowadays, we covet the creations of The Hummingbird Bakery and their trusty cookbook, to satisfy our cravings for this delicious cake. 

For weeks now I have been whole heartedly dreading the Olympics coming to London. The thought of crowds of tourists everywhere, standing on the left on escalators, stopping in the street to take pictures and generally being in MY way during my commute to work has been giving me serious anxiety. However, now that the event is finally here and well and truly in full swing, I have officially caught Olympic Fever, finding myself enjoying watching sport more than ever before and swelling with pride as Great Britain creep up the medals table.

So, what better time would there be to make my very own "Team GB Red Velvet Cupcakes"…Union Jacks and all. 

The timing also coincided with two of my friends homecoming from summer long trips so me and my home gal Jess set about making these goodies as a surprise! 

As mentioned before the recipe is taken from The Hummingbird Bakery's "Cake Days" cookbook and decorated in patriotic red, white and blue!


The beauties fresh from the oven


The final product!


And all that was left is crumbs...