Thursday, 22 November 2012

Seedy Honey and Spelt Bread


I've always wanted to try my hand at baking my own bread but saw the whole thing as time consuming and a bit of a hassle. However, in my first attempt at making bread I was proved wrong. I loved the satisfaction of watching the dough rise and how simple this recipe was to follow, producing a lovely soft bread. The smell of freshly baked bread filling the house up isn't bad either. 
I think this one turned out pretty well and I can't wait to try out other bread recipes now!

Spelt flour gives bread a subtle nutty flavour and is also a good choice for people with gluten intolerance's.

I highly recommend eating this loaf warm, straight from the oven with butter and honey or lightly toasted with cheese and your favourite chutney or pickle. I'm looking forward to breakfast time and trying it slathered in peanut butter...it may just make 6am more bearable.


Please Note - Wholemeal and spelt flours absorb more water so if the dough feels slightly sticky at the beginning do not panic as the water will soon be absorbed. If there is too little water from the start your bread will be heavy and dry. 

Beautiful!

Ingredients:
600g Spelt Flour (I used a seeded mix but you can use white or wholemeal spelt)
7g sachet dry action yeast
2 teaspoon salt
2 tablespoons honey
500mls (approx) warm water
2 teaspoons olive oil
Handful of sunflower seeds (or any other you prefer) 


To Make:
  • Preheat oven to 180°C and grease and flour a loaf tin. 
  • By hand mix all the dry ingredients together in a bowl, make a well and pour in oil, honey and enough water to make a stiff dough. 


  • Cover the dough with cling film and leave for about 1 hour in a warm place to allow the dough to double in size 
  • Turn out onto a floured board and shape in to a smooth ball. 
  • Place into the prepared loaf tin and leave again to double in size. 
  • Sprinkle over mixed seeds. 


  • Place in oven and cook for 30-35 minutes or until golden brown.

Monday, 19 November 2012

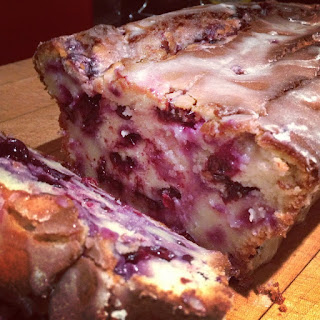
Lemon and Blueberry Loaf


Yesterday was ma mamas birthday so I thought I'd make a little something for her. I definately did not inherit my sweet tooth from my mum, and although she likes a little sweet treat, I dont think she would have quite appreciated the chocolate cheesecake cake that I made for Jess's birthday.
So, with my audience in mind, I set about making this delicious lemon and blueberry loaf. The lemon syrup that is poured over the top after baking keeps the loaf super moist and tangy and the lemon glaze adds a sweetness and a crunch that makes this loaf so good. 
It's safe to say that it went down very well, as I came to have some this morning only to find one very empty tin and no loaf in sight. 
Luckily I had managed to sneak a test slice before giving it away as it didn't stick around for long! 


Ingredients:

For the Loaf:
1 1/2 cups plain flour
2 teaspoons baking powder
1/2 teaspoon salt
1 cup greek yogurt
1 cup caster sugar
3 large eggs
2 teaspoons grated lemon zest (approximately 2 lemons)
1/2 teaspoon pure vanilla extract
1/2 cup vegetable oil
1 1/2 cups blueberries, fresh or frozen
For the Lemon Syrup:
1/3 cup freshly squeezed lemon juice
1/3 cup caster sugar
For the Lemon Glaze:
1 cup icing sugar, sifted
2 to 3 tablespoons fresh lemon juice
1 teaspoon vanilla extract
1 tablespoon water

To Make:
  • Preheat the oven to 180°C. Grease bottom and sides of a loaf pan; dust with flour, tapping out excess.
  • In a medium bowl, sift together flour, baking powder and salt; set aside.
  • In a large bowl, whisk together the yogurt, sugar, eggs, lemon zest, vanilla and oil. 
  • Slowly whisk the dry ingredients into the wet ingredients. 
  • Fold the blueberries very gently into the batter.
  • Pour the batter into the prepared pan.


  • Bake for 50 to 55 minutes, or until a toothpick inserted in the center of the loaf comes out clean. 


  • Let cool in the pan for 10 minutes before removing loaf to a wire rack on top of a baking sheet.
  • While the loaf is cooling, make the lemon syrup in a small saucepan over medium heat. Stir together the lemon juice and sugar until the sugar is completely dissolved. 
  • Once dissolved, continue to cook for 3 more minutes. Remove from the heat; set aside.
  • Use a toothpick to poke holes in the tops and sides of the warm loaf. 
  • Brush the top and sides of the loaf with the lemon syrup. Let the syrup soak into the cake and brush again. 
  • Let the cake cool completely.


  • To make the lemon glaze, in a small bowl, whisk together the icing sugar and 2-3 tablespoons of the lemon juice and the vanilla and water. The mixture should be thick but pourable. Add up to another tablespoon of lemon juice if the mixture is too stiff. 
  • Pour the lemon glaze over the top of the loaf and let it drip down the sides. 

  • Let the lemon glaze harden before serving. 


Friday, 16 November 2012

Pecan Pie Bars


In England you cannot get a good pecan pie. I am yet to find one anyway.
I've tried real, proper Pecan Pie on American soil and it was incredible. 
I've also tried making my own pie and I'm going to put it down to a dud recipe but it did not live up to my own hype.

So, what to do when you want a nice slice of pie and there's no diner on the corner or an American grandma in the kitchen with her own trusty recipe? Well all you have to do is use my recipe for Pecan Pie Bars. They're simpler than making a whole pie but don't scrimp on the sweet, crunchy, nuttiness of propa pie.

If you can manage to get out of bed as the days are getting colder (and shorter) then I highly recommend making these. To make them even more of a treat, try heating a bar in the microwave for 1 minute and covering with my cheats, dairy free custard (recipe here). 

Ingredients:
For the base:
2 sticks unsalted butter, softened
2/3 cup soft light brown sugar 
2 2/3 cups plain flour 
½ teaspoon salt
For the topping:
½ cup unsalted butter 
1 cup soft light brown sugar 
1/3 cup honey 
2 tablespoons double cream 
2 cups chopped pecans


To Make:
  • Preheat the oven to 180ÂșC and line a 9x13-inch pan with greaseproof paper.
Make the base:
  • Cream together the butter and brown sugar until fluffy.
  • Add the flour and salt and mix until crumbly. 


  • Press the base into the lined pan and bake for 20 minutes until golden brown.
Make the filling:
  • Combine the butter, brown sugar, honey and heavy cream in a saucepan and stir over medium heat. Simmer the mixture for 1 minute, then stir in the chopped pecans.


  • Remove the base from the oven and immediately pour the pecan filling over the hot crust spreading it to cover the entire surface.


  • Return the pan to the oven and bake an additional 20 minutes.
  • Remove the pan and allow the bars to fully cool in the pan.
  • Lift the bars out of the pan and transfer them to a cutting board. 
  • Peel off the greaseproof paper and slice into bars.


Tuesday, 13 November 2012

Red Lentil and Pumpkin Soup


No cake today. Something rare is occuring and I'm bloggin' some savoury deliciousness. Perfect for autumn, you can use fresh pumpkin puree when in season or use tinned any time of year!

Ingredients:
1/2 onion, chopped
2 cloves garlic, crushed
3 1/2 cups vegetable stock
1 cup dried small red lentils
2 tsp ground cumin
1 tsp ground cinnamon
2 tsp paprika

1/2 red chilli, finely chopped
salt and pepper to taste
1 cup water
3/4 cup pumpkin puree (fresh or canned)
2 inch fresh ginger, peeled and minced


To Make:

  • Heat a medium pot over medium-high heat. 
  • Add oil to pan; swirl to coat once hot. 
  • Add onion and garlic to pan and sweat for about 4 minutes. 
  • Stir in 3 cups of stock, lentils, the chilli, cumin, cinnamon and paprika.
  • Bring to a boil. 
  • Cover, reduce heat and simmer 10 minutes or until lentils are tender. 
  • Place the lentil mixture in a blender or blend with an immersion or stick blender. Remove centre piece of blender lid (to allow steam to escape) 
  • Place a clean towel over opening in blender lid (to avoid splatters). 
  • Blend until smooth. 
  • Return lentil mixture to pan over medium heat. 
  • Add remaining 1/2 cup broth, 1 cup water, and pumpkin to pan.

  • Cook for 3 minutes or until thoroughly heated. 
  • Stir in ginger and add seasoning to taste.


Tuesday, 6 November 2012

Double Chocolate Cookie Sticks


Cookies are what I make when I feeling like baking something and have a craving for something sweet (normally chocolate) but can't be bothered to go and get ingredients for anything too exciting. We will always, without fail, have the ingredients for cookies in my house, if we don't its most likely a sign of the end of the world. 

So anyway, the other day said cravings set in but who wants to get dressed on a Saturday off work to go to the supermarket? Not me. These double chocolate cookie sticks are pretty much the easiest things ever. They take less than 10 minutes to bake and you only need one bowl. To further my ridiculous laziness I didn't even feel like making them into individual cookies so made one lovely big one and cut him up into sticks. Easier for dunkin' anyways. They also taste really good, so that's cool too. Enjoy!


Ingredients:
1/2 cup melted butter
1/2 cup caster sugar
1/2 cup soft light brown sugar
1 large egg
1 teaspoon pure vanilla extract
1 cup plain flour
1/2 cup cocoa powder
1/2 teaspoon baking powder
1/2 teaspoon salt
1 cup chocolate chips

To Make:

  • Preheat oven to 180° C. 
  • Line a baking sheet with greaseproof paper. 
  • In a large bowl, combine the butter, sugars, egg and vanilla. 
  • Gradually fold in the flour, cocoa powder, baking powder and salt to the sugar mixture and mix until well combined.
  • On the prepared baking sheet, shape the dough into a rectangle. Sprinkle with chocolate chips; pressing them lightly into the dough. 


  • Bake in preheated oven for 7-9 minutes. Cool for about 10 minutes. 
  • Cut with a sharp knife into 1-in. strips; remove from tray and put on wire racks to cool completely.


Friday, 2 November 2012

Chocolate Cheesecake Cake


So, one of my bestest friends 21st birthday was last week and I went up to Nottingham to see her and pretend to be a student for a little bit. Obviously I also took cake.
Jess was my partner in crime all throughout summer, helping out on most of the recipes on here so she deserved something of a special cake for her big 2-1. She also loves black bottom cupcakes and every time we have them says how good they would be in big cake form…so obviously I took this as my cue and my inspiration came from there. 
Instead of baking cheesecake into the chocolate cake I decided to bake a whole separate cheesecake and have it as a layer in between two chocolate sponges. (The cheesecake also had chocolate chips just incase there wasn't enough chocolate already) Like the real black bottoms the whole thing was then topped off with cream cheese frosting and I went a little OTT on the decorating.
The result? A pretty giant, horrendously calorific, but amazing 21st birthday cake. I think she might have liked it just a little bit…


You can cheat a tiny bit when making this and use chocolate cake mix rather than making it form scratch, you are making a whole cheesecake after all. The cheesecake recipe here is a really good one and would obviously be just as delicious baked as a "normal" cheesecake, just by adding a biscuit base and er…not sandwiching it between two giant chocolate sponges. 

Ingredients:
For the chocolate cake:
400g caster sugar
220g plain flour
65g unsweetened cocoa powder
1tsp baking powder
1tsp bicarbonate of soda
1/2tsp salt
2 eggs
235ml milk
1tsp vanilla extract
120ml melted butter
235ml boiling water
(or one Box of Devils Food Chocolate cake mix)
For the Cheesecake:
500g cream cheese at room temperature
200g caster sugar
3 eggs
2 tbsp cornflour
300g sour cream
1 tsp vanilla essence
100g choc chips
For the Cream Cheese Frosting:
600g icing sugar
100g butter
250g cream cheese

To Make:

Make the Cheesecake:
  • Pre heat oven to 150°C.
  • Grease a loose bottom cake tin and line with greaseproof paper (as there is no base to the cheesecake we want to make sure it will come out of the tin!)
  • Place the cream cheese and sugar in the bowl and mix with an electric whisk or in a food processer for 2-3 minutes. 
  • Add the eggs, one at a time, beating well after each addition. 
  • Add the cornflour, sour cream and vanilla essence and process for 30 seconds to combine.
  • Finally stir in the chocolate chips.


  • Pour into the tin and bake for 1 hour. When cooked, the cheesecake should be well-risen, with a golden brown top. It should feel slightly firm to the touch – if the mixture still appears wet, continue to bake a little longer. When cooked, allow the cheesecake to cool in the oven, with the door open. When completely cool, place in the fridge. 


I made the cheesecake the day before baking and assembling the whole cake just so that it had plenty of time to cool and set, so it was in the fridge overnight. 
When making the chocolate cake, I took the cheesecake out of the fridge, removed it from the tin and wrapped it in cling film before popping it into the freezer for an hour before assembling the cake so that it was easy to handle and layer the cake up!

Make the Chocolate Cake:
  • Preheat oven to 175°C. Grease and lime two 9inch cake tins.
  • In a medium bowl, mix together the sugar, flour, cocoa, baking powder, bicarbonate of soda and salt.
  • Add the eggs, milk, butter and vanilla. Mix until fully incorporated with a handheld electric whisk or in a food processor.
  • Stir in boiling water. (The cake mix will be quite runny, but don't worry! It makes the moistest sponge)
  • Pour evenly into the two prepared tins and bake for 30-35 minutes.
  • Cool for 10 minutes before removing from tins and leaving to cool completely.

Make the cream cheese frosting:
  • Combine the cream cheese and butter and gradually add the icing sugar, sifting to ensure there are no lumps and mix until smooth.


Assemble the cake:
  • When the chocolate cake is completely cool start assembling the cake by placing one layer of chocolate cake on a board and spreading a thin layer of cream cheese frosting over it.
  • Pop the chilled cheesecake on top and spread another thin layer of frosting and top of with the final chocolate cake.


  • Cover the entire cake (top and sides) with a very thin layer of frosting and chill in the fridge for about an hour. This acts as a crumb layer and helps to ensure the end result is smooth and crumb free!


  • Remove the cake from the fridge and frost all over. 
  • Decorate as desired.